Virtual NMR Spectrometer: The Main Window
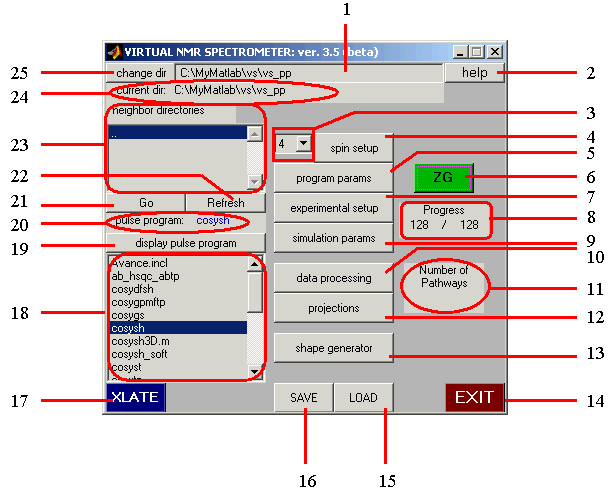
- Directory edit box: Use this box to type in a new directory where pulse programs might be located.
- Help button: Using this button to get link to help files. Currently available: info about the
version, authors, and acknowledgements.
- Number of Spins pulldown menu: Click the downward pointing arrow and drag to change the
number of spins in the system that will be used for simulation. After selecting the desired number of
spins, click the Spin Setup button (4). Note: if you change already selected number of spins,
you will have to click this button twice (not double-click!):
once to recalculate the spin density operator for the new number of
spins, again to open the Spin Setup window and configure the spin system.
- Spin Setup button: Click this button to open the
Spin Setup window. This window allows the user to configure a particular spin
system for a simulation - type of nuclei (1H,15N,13C) and relevant parameters such as chemical shift,
relaxation and cross-relaxation rates, scalar coupling, etc. This window also can be used to toggle the
projection tracing mode and to select basis operators for tracing spin-density components during the
experiment. Also features Relaxation Calculator, a built-in tool for calculating
relaxation rates for a given nuclear pair.
- Program Parameters button: Click this button after translating a pulse program (17) to open the
Program Parameters window. This window allows the user to define and modify the
variables used in the pulse program that has been translated.
- ZG button: Click this button after setting all parameters (e.g. spin system, experimental,
and pulse sequence parameters) to begin the simulation. This button appears dark until a valid pulse sequence has
been translated into a matlab script, then it turns green, indicating that the pulse sequence has been
translated and you can now proceed with the simulation. If there was an error in pulse program execution
(e.g. some of the params were not defined etc), this button will turn blue; usually, an explanatory message
will be displayed in the matlab window in this case. You can click on the blue ZG button to start the simulation
(after fixing the problem of undefined experimental parameters). (See (17) in this window for instructions on
translating a pulse sequence).
- Experimental Setup button: Click this button to open the
Experimental Setup window. This window allows the user to set parameters such as the
spectral width, carrier offset, resolution, etc.
- Progress display counter: This counter displays the progress of the simulation. The denominator is the
total number of rows of data to be simulated. The numerator is the number of rows already simulated.
- Simulation Parameters button: Click this button to open the
Simulation Parameters window. This window allows the user to set parameters such as the
spectral width, carrier offset, resolution, etc.
- Number of Pathways display This counter will display the total number of coherence transfer
pathways (for all of the spherical basis operators) during a simulation in which CTP approach was selected
in the Simulation Parameters window.
- Data Processing button: Click this button to open the Data Processing window.
This window provides all of the standard tools to process "raw" acquisition data and display it as a spectrum.
- Projections button: This button opens the Projection Display window
to show the projection of the spin density onto selected basis operators during
a simulated pulse sequence. In order for this window to contain information, prior to
starting the simulation, the user must select the projections to be analyzed in the
Spin Operator Tracing edit window of the Spin Setup window.
- Shape Generator: This button opens the Shape Generator window
to design/visuallize standard or used-defined shapes for shaped pulses of PFG.
- EXIT button: Using this button to exit the virtual spectrometer is preferable to simply closing the main
pannel by clicking the 'x' in the upper right corner of the window because clicking the EXIT button will
close other subordinate windows and clear temporary files and workspace variables.
- Save button: Click this button to save the results of current session or the experimental settings. Opens
Save Data Window.
- Load button: Click this button to read in the results of previous sessions or experimental settings. Opens
Load Data Window.
- Translate Pulse Program button: Click this button after selecting a pulse program in the
Pulse Program Selection edit window(18) to translate the pulse program into a simulation
script that matlab can execute.
- Pulse Program Selection edit window: Click this window and use the arrow keys or the mouse to select
a pulse program from the active directory. To change the active directory, use either: the
Directory Selection edit window & Go button (23 & 21), or the Directory edit box &
Change Directory button (25 & 1).
- Display Pulse Program button: Click this button to open a new window to display the pulse program
selected in the Pulse Program Selection edit window (18).
- Pulse Program display: This text displays the name of the pulse program that has most recently been
translated into a matlab script (i.e. the one that will be run if the ZG button (6) is pressed).
- Go button: Click this button to change to the directory selected in the
Neighbor Directory edit window (23).
- Refresh button: Click this button to refresh (re-read) the content of the selected directory: this
could be useful if the content of this directory has been changed after it was displayed.
- Neighbor Directory edit window: Click on this window and use the arrow keys or the mouse to
select a directory. Use this window to navigate towards a directory that contains pulse programs
that can be translated.
- Current Directory display: This text display indicates the current active directory. Files containted
in the active directory are diplayed in the Pulse Program Selection edit window (18).
- Change Directory button: Click this button to change the active directory to the one in the
Directory edit box (1).
BACK TO VNMR MANUAL
Back to top
Page designed by Peter Nicholas. Last modified 12/26/03 by David Fushman.