INTRODUCTION -- Simulating a COSY Experiment
Assuming that you have installed VNMR according to the Installation Instructions
and managed to launch the program from the command line in Matlab (just
type vsnmr and press return), this page will give explicit step-by-step
instructions for running a simple COrrelation SpectroscopY (COSY) experiment
on a 2-spin system. Once you are comfortable with using the program as
explained here, try experimenting with more complex spin systems or new
experiments. Additional examples can be found in the Tutorial
--STEP 1--
When you typed
>> vsnmr
a new window like this one should have appeared (the actual colors and fond sizes could depend on screen settings for your computer):
This is the main console of the virtual spectrometer. From this
window one can access all of the modules and data entry windows.
-
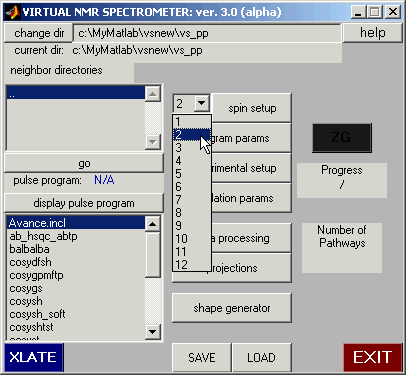
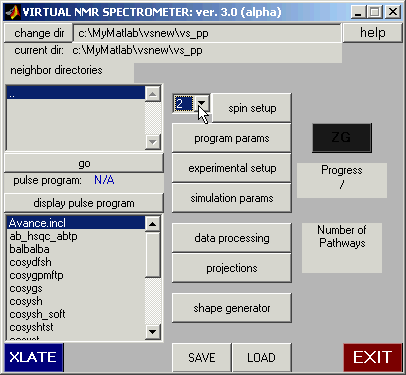
Begin by setting the number of spins to 2. Locate the Spin Setup
button (the Spin Setup button is the top button in the middle column).
To the left of the Spin Setup button is a pull down menu that allows
the user to select the number of spins. The default number is 1.
Click on the downward pointing arrow and drag the counter to select 2 spins.
--STEP 2--
Now click the Spin Setup button.
When you press the Spin Setup button, the following window should appear:
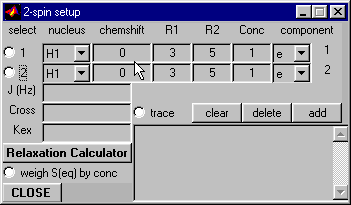 Although this
window contains many buttons and options, we will use only a few of them
at this time. By default, the nuclei are protons, as appropriate to this
experiment. (Later, in other experiments we will introduce other nuclei
into our spin system.)
-
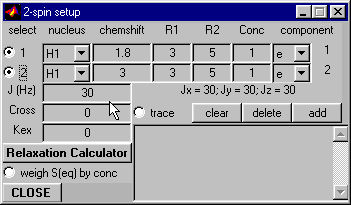
Begin by entering (typing) a chemical shift for each of the two nuclei, say 1.8 and
3 ppm for nuclei 1 and 2, respectively. Simply click on the zero in
the Chemshift column and type in the new value.
-
Next set the J-coupling between the spins to 30 Hz:
-
Click on the radio button to the left of each nuclei (next to the 1
and 2).
-
When both buttons are active simultaneously, zeros will be displayed in
the coupling edit boxes. Click on the J(Hz) box and type 30.
Since this is a system of like spins, the other components of the coupling will
be automatically set to Jx = Jy = Jz = 30 Hz.
Now the Spin Setup Window should look like this:
Click on the CLOSE button to close the Spin Setup window.
--STEP 3--
The next step is to select an appropriate experimental pulse sequence. For this
demonstration we will use the cosytp program located in the vs_pp
directory.
First you must locate the vs_pp directory.
By default, you should be in this directory after starting VNMR (The current directory is indicated in the "current dir" line).
If you are not in this directory or if your pulse program is in a different directory, follow these steps:
- Select the
vs_pp directory in the scroll window in the upper left of the Main
spectrometer pannel by clicking it (this is the window just above the go button.)
- Click the go button
Now scroll through the list of pulse programs in the window below the one you just used
to select the PULSE program. Select the cosytp
pulse program by clicking it (use a single click!).
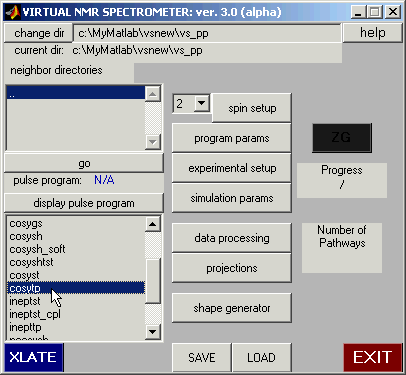
Now click the xlate button in the lower left of the Main Window.
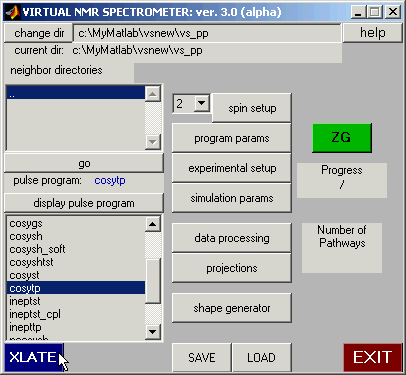
Once the pulse program has been translated into a MATLAB script that the
virtual spectrometer can execute, the ZG button that initiates the simulation
turns green, indicating that the spectrometer is ready to proceed. The pulse program name should appear in in the "pulse program" line.
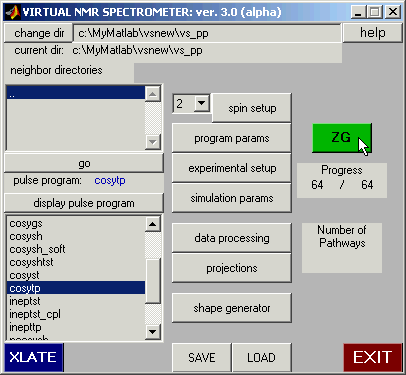
The Main pannel should now look like this:
--STEP 4--
Now is a good time to adjust the acqusition parameters for the pulse program we have chosen.
Click on the program parameters button that appears just below the Spin Setup button.
The following window should open:
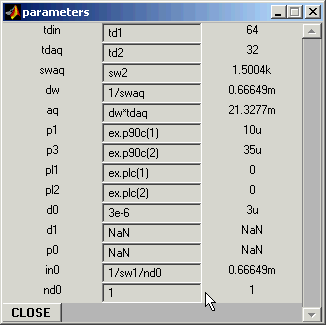 The simulation cannot proceed if any of the parameters has a NaN value (i.e. is unassigned). Therefore
enter the following values:
- for
nd0 enter: 2
- for
p0 enter: p1
- for
d1 enter: 1
Although a detailed understanding of the reasons for these changes is not necessary to run the
present experiment, the following explanation may be helpful for future simulations. In this
version of the COSY experiment, the pulse designated p0 can be of some angle less than 90 degrees;
the value entered earlier simply makes this a 90 degree pulse (you can also type
ex.p90c(1) or 10u here). You can experiment with other values.
The recycling delay d1 is set to 1 sec, allowing plenty of time for the system to relax to equilibrium. The
value of nd0 must be set to 2 for all experiments that use TPPI processing for t1 frequency discrimination.
(A more detailed explanation of the reason for this may be found in the NMR textbooks or in the
data processing tutorial (currently not available).)
Now the Program Parameters Window should look like this:
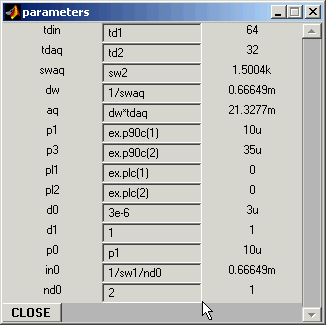
Click on the CLOSE button to close the window.
--STEP 5--
The final step before running the simulation is to set the carrier feequency for the 1H channel and the
desired spectral resolution.
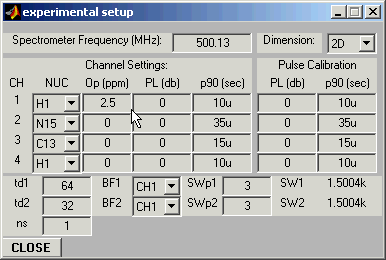
Click on the experimental setup button in the Main pannel. Set the following values:
- Op(ppm)=2.5 (carrier frequency (in ppm) for channel 1)
- td1=64 (number of data points in t1-dimension)
- td2=32 (number of data points in t2-dimension)
- SWp1=3 (spectral width (in ppm) in t1-dimension)
- SWp2=3 (spectral width (in ppm) in t2-dimension)
(the appropriate edit boxes are in the middle and at the bottom of the Experimental Setup window.)
The resolution of the final spectrum will be equal in the t1 and t2 directions after processing
to achieve quadrature detection in t1.
Make sure that the "dimension" of the experiment is set to 2D.
Click on the CLOSE button to close the window.
--STEP 6--
Start the simulation by clicking the green ZG button on the Main simulation panel.
The simulator's progress will be displayed as the numerator in the Progress counter
box just below the ZG button.
--STEP 7--
The simulation will finish when the current increment number shown in the numerator of
the Progress box reaches the max. number shown in the denominator. This simulation takes
about 3 seconds on a 350MHz P-II. Click on the Data Processing button, and the following data
processing window appear:
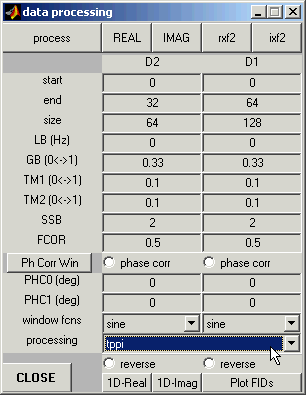
- Select TPPI processing from the processing pulldown menu on the bottom of the window.
(The default is
states)
- Click the process button to process the data. (Wait about a second).
- Click the REAL button to display the real component of the spectrum.
The spectrum should appear like this:
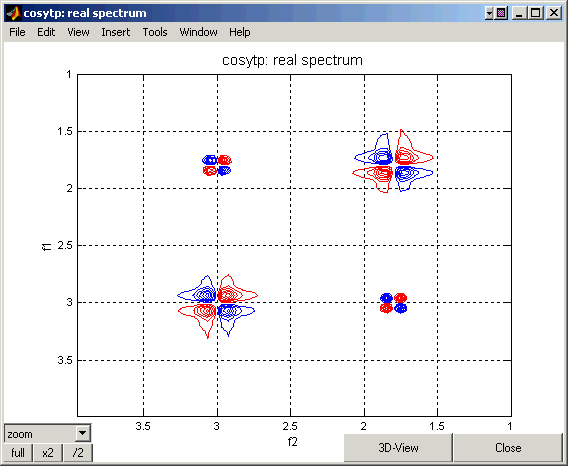
If the spectrum you obtained is similar to the one shown above, you have successfully completed the introductory
VNMR tour. Now you are ready to experiment with the Virtual NMR Spectrometer. CONGRATULATIONS!
3D View
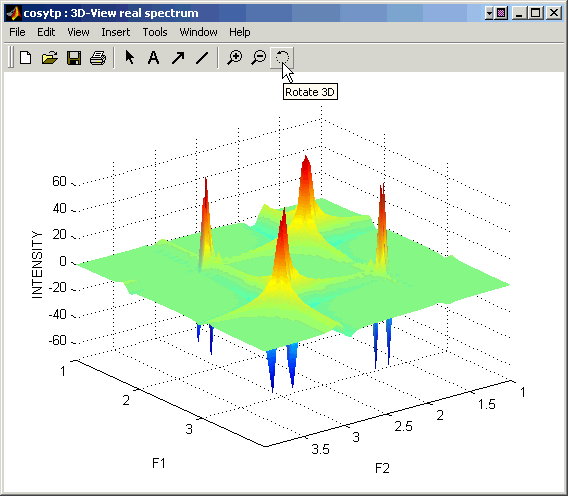
You can also click the 3D-View button on the bottom of the spectrum window to see a 3-dimensional representation of the spectrum (see the 3D plot below). Select the "Rotate 3D" Matlab button to rotate this plot in three dimensions.
BACK TO VNMR MANUAL
Back to top
This introductory tour was designed by Peter Nicholas. Last modification by David Fushman 12/25/2003.
(c) Copyright 2003 by David Fushman, University of Maryland.
 Although this
window contains many buttons and options, we will use only a few of them
at this time. By default, the nuclei are protons, as appropriate to this
experiment. (Later, in other experiments we will introduce other nuclei
into our spin system.)


 The simulation cannot proceed if any of the parameters has a NaN value (i.e. is unassigned). Therefore
enter the following values:


